Tuesday, June 7, 2011
Thursday, March 3, 2011
77 FEATURES OF WINDOWS -7 PROFFESSIONAL,ULTIMATE,ENTERPRISE
1.XP Mode 2.windows 7 compatibility mode 3. Creat and Mount VHD files.
4.Jump to the Jumplists 5.Preview Running Apps 6.AeroPeek the Desktop
7.Snap and Shake into Place 8.Switch Multiple display devices 9. A stage for your device 10. Eliminate the Notification Area 11. Problem steps Recorder 12. Burn Images
13. Troubleshooting computer Problem 14.Build a startup Repair CD
15. AppLocker to Rescue 16.Awesome calculator 17.Get a power Efficiency Report 18. System restore Born Again. 19.New Time zone utility 20.Calibrate your display 21.clean up live Essentials 22.Magnifier tool Re-Done 23.HomeGroup Networking 24.Preview and stream your music 25.Action Center 26.Pin, Remove with the New Taskbar 27.Launch your Preview 28.Right click Everything 29.Desktop Slideshow 30.Customize the Log-on Screen 31.Restore the Old Quick Lauch Toolbar
32.Custom Power Switch 33.Auto Arrange Your Desktop 34.Disable Smart window Arrangement 35. Browse Your tasks 36. Boost with readyBoost 37.Display your Drivers 38 Hiding the windows Live Messenger Icon 39 Reduce the Icon Size 40.UAC Re-Done
41.Stick notes Are Built in 42.Open folder in new process 43.Preview Fonts
44.Restore Your Gadgets 45.New Wordpad Formats 46.Protect Your Data
47.Run As is Back 48.Search in Privacy 49.Tweak PC Volume
50.Extend Your Battery Life 51.Write Crash Dump Files 52.Go 64bits
53.Windows Powershell v2. 54.Shift to and from Explorer and command prompt
55.Deployment Image servicing and Managment (DISM) 56.Check Reliability
57.Snipping Tool 58. Reduce the Clutter 59.New Mouse click for Administration 60.Faster Installation 61.Additional Clocks 62.Associate Your files
63. Robocopy 64.remote Desktop Tools 65.Add Shared folder to Library 66.Manage Passwords 67.Trigger and Events54.shift to and from Explorer and command prompt 68.Windows live 69.Uninstall apps and IE8 70. windows 7 Experienced Rating 71.Analyze Processes 72.Surf InPrivate 73.Enhance Task Manager
74.Your system Health 75.Install it on the Old computer 76.Redesigned help and Support 77.17Useful Windows Hotkey Shortcuts
Wednesday, February 16, 2011
Netstat commands and their USE
Netstat command and their use for windows server
Netstat-a---- it show all connections and listening ports.
it is most common used parameter
 Netstat-f------it show FULLY QUALIFIED DOMAIN NAME (FQDN) above image show result of this command .
 Netstat-a-n-o it show PID process identifier is open
Netstat-b --- give list of each process with user friendly way
Netstat-r --- it show Routing table of system

Netstat-a---- it show all connections and listening ports.
it is most common used parameter


Netstat-b --- give list of each process with user friendly way
Netstat-r --- it show Routing table of system

Monday, February 14, 2011
Windows XP Home Network Setup: Essential Steps
Windows XP Home Network Setup: Essential Steps
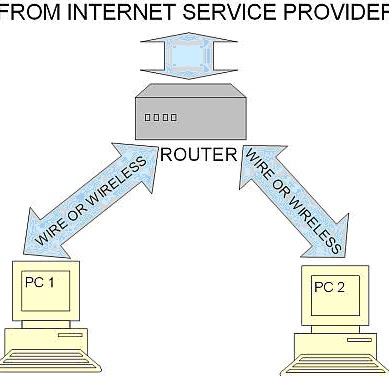
Lots of homes nowadays have more than one computer, with all of them sharing one Internet connection (the household carries a single subscription to the Internet service provider of their locality).Computers are becoming cheap and powerful, to say nothing of their usefulnesss for both school and work.With lots of computers in the home, it is essential to build a home network. This article can be used not only for creating a home network, but its concepts and techniques can also be applied to a small office network.
Computer networking offers a lot of advantages in terms of cost and productivity, such as:
- Family members can share files and programs instead of needing to transfer them physically from one location to another with a USB stick or other physical methods.
- The monetary savings of having one vs. multiple ISP subscriptions. If the ISP allows home networking (some will NOT so you'd better check with the ISP before subscribing), you can share your single Internet subscription with other computers in your home by using a router. In this case, you only have to pay a single monthly bill for your Internet connection.
The Requirements and the Basics
The Requirements and the Basics
To network computers using Windows XP, you will need the following
- At least two computers in your network
- A LAN card for each computer
- One router for connecting the computers and the Internet
- One Internet subscription line
Once you have this set of hardware components as well as an Internet connection, it is time to connect your router to the computer
Windows XP Home Network Setup: Essential Steps - Configuring the Router
You only need one computer attached to the router to configure it, but it MUST be attached. You cannot configure your router for networking without a computer attached to it. Say you connect PC1 (personal computer 1) first to the router. Depending on the router type, the input/output system of the router consists of two types of ports. These are Ethernet port inputs and the WAN port inputs.
The Ethernet inputs are used to connect the router to other computers under the network. The WAN port is used to receive the Internet connection coming from other routers or gateways. However, it can be confusing to beginners, so below is an image of a router back (using a WRT54GC Wireless router):
 Using a LAN cable (you can buy this at computer store), connect one end to Port 1 (see screen shot above) and the other to the LAN port of your network card. Using the built-in network card from the PC's motherboard will work fine, so in this case there is no need to purchase another network card.
IMPORTANT: Do NOT connect other computers to this router or connect Internet input from your ISP to this router yet. Only connect one computer to this router at this time (for configuration purposes).
Once connected, turn on the router. You can connect the router power cord at one end to the power port shown above, and plug it in. The next thing you will do is test whether the router's connection is okay.
Using a LAN cable (you can buy this at computer store), connect one end to Port 1 (see screen shot above) and the other to the LAN port of your network card. Using the built-in network card from the PC's motherboard will work fine, so in this case there is no need to purchase another network card.
IMPORTANT: Do NOT connect other computers to this router or connect Internet input from your ISP to this router yet. Only connect one computer to this router at this time (for configuration purposes).
Once connected, turn on the router. You can connect the router power cord at one end to the power port shown above, and plug it in. The next thing you will do is test whether the router's connection is okay.
Here is an example of a message you would receive if your router's connection is okay
Pinging 192.168.1.1 with 32 bytes of data:
Reply from 192.168.1.1: bytes=32 time<1ms TTL=128
Reply from 192.168.1.1: bytes=32 time<1ms TTL=128
Reply from 192.168.1.1: bytes=32 time<1ms TTL=128
Reply from 192.168.1.1: bytes=32 time<1ms TTL=128
Ping statistics for 192.168.1.1:
Packets: Sent = 4, Received = 4, Lost = 0 (0% loss),
Approximate round trip times in milli-seconds:
Minimum = 0ms, Maximum = 0ms, Average = 0ms
Most routers are shipped with 192.168.1.1 as the default local IP address; however, if this doesn't work and you are sure that the cable connection to the router is correct, please check with the router manual. It may point you to other configuration options or local IP addresses.
Windows XP Home Network Setup: Essential Steps - Configuring the Internet Connection
You can use your Internet browser (such as Internet Explorer, Safari, Chrome or Fire fox) to see the router dashboard/control panel. You need to take this step to configure your Internet connection. First, open your browser. Then type in the address bar below:
http://192.168.1.1
Then press enter.
Most routers will ask for your username and password. The default is using admin as the username and password. You can check with your router's manual to see the default username and password. Once you have successfully logged in, you will be taken to your router's basic setup page.
The router configuration largely depends on the way your ISP delivers the Internet connection to your computer. However, the most common “Internet Connection type” is “Automatic Configuration-DHCP.” So the typical settings are the following
Router name: Fill this in with your router name (e.g WRT54G)
Host name: {leave this blank}
Domain name: {leave this blank}
MTU: Auto
Size: 1500
Local IP address: 192.168.1.1 (note: however this router IP address can change if you have two or more routers in your network.).
DHCP Server: Enabled
Starting IP address: 192.168.1.100 (note: this may change if the router address is not based on 192.168.1.1, like if you have two or more routers)Maximum Number of DHCP users: 50
Client lease time: 0
Static DNS 1 to Static DNS 3: (Set to all zero e.g. 0.0.0.0)
WINS: 0
Time zone: select your appropriate time zone.
After all of these settings have been made to your satisfaction, click, “save settings.”
Windows XP Home Network Setup: Essential Steps - Configuring Your Computer to Connect
Go to Control Panel (in your Windows XP computer), and then click on Network connections. Look for “Local Area Connection.” Right click on it, and click “Properties.” Find “Internet Protocol (TCP/IP)” and click Properties. The following should be checked:
Share your connection
If there is no problem with anything you've done up to this point, you are now ready to connect other computers to the network. To do this, simply connect a LAN cable from the network card to the router's Ethernet inputs (see screen shot in the previous page). After connecting, do the same ping test in the DOS mode, targeting 192.168.1.1 (the router's IP address). If there is a reply, the connection has been made. Do the same with a wireless connection -- however, you will not be using Ethernet cable of course; instead, follow the procedure in your wireless network card manual.
Finally, to make file sharing work with other computers, make sure:
- Obtain an IP address automatically.
- Obtain DNS server address automatically.
- Client for Microsoft networks.
- File and printer sharing for Microsoft networks.
- QoS Packet scheduler d. Internet Protocol (TCP/IP) (the most important).
Share your connection
If there is no problem with anything you've done up to this point, you are now ready to connect other computers to the network. To do this, simply connect a LAN cable from the network card to the router's Ethernet inputs (see screen shot in the previous page). After connecting, do the same ping test in the DOS mode, targeting 192.168.1.1 (the router's IP address). If there is a reply, the connection has been made. Do the same with a wireless connection -- however, you will not be using Ethernet cable of course; instead, follow the procedure in your wireless network card manual.
Finally, to make file sharing work with other computers, make sure:
· File and printer sharing is enabled under Local Area Connection properties, using the procedure explained earlier.
· Go to Control Panel -> Network Connections -> Network Setup wizard. Follow the wizard procedure. When presented with the appropriate option, choose “This computer connects to the Internet through another computer on my network or through a residential gateway” and finally, select “Just finish the wizard; I don't need to run wizard on other computers.”
Restart the computers in your network, and you can start sharing files.
How can one Enable his registry when get Disabled
Below text can save it to your Windows desktop as
UnHookExec.inf
[Version]
Signature="$Chicago
Provider=Symantec
[DefaultInstall]
AddReg=UnhookRegKey
[UnhookRegKey]
HKLM, Software\CLASSES\batfile\shell\open\command,,,"""%1"" %*"
HKLM, Software\CLASSES\comfile\shell\open\command,,,"""%1"" %*"
HKLM, Software\CLASSES\exefile\shell\open\command,,,"""%1"" %*"
HKLM, Software\CLASSES\piffile\shell\open\command,,,"""%1"" %*"
HKLM, Software\CLASSES\regfile\shell\open\command,,,"regedit.exe ""%1"""
HKLM, Software\CLASSES\scrfile\shell\open\command,,,"""%1"" %*"
HKCU, Software\Microsoft\Windows\CurrentVersion\Policies\System,DisableRegistryTools,0x00000020
this will enable registry when get disable by virus
Sunday, February 13, 2011
Troubleshoot PC system slowdowns
1: Processor overheating
2: Bad RAM
3: Hard disk issues
4: Disk type and interface
5: BIOS settings
6: Windows services
7: Runaway processes
8: Disk fragmentation
9: Background applications
These are basic step to check the reason why pc slow down
1: Processor overheating
Chipmakers have recently been working to make processors more efficient, which means they
generate less heat. Nonetheless, some modern processors still generate a lot of heat. That’s why all
processors require some sort of cooling element, typically a fan of some type. A system’s Thermal
Design Point (TDP) rating indicates, in watts, how much heat it can safely dissipate without
exceeding the maximum temperature for the chip. When the processor temperature goes over spec,
the system can slow down or run erratically (lock up) or may simply reboot. The processor fan may
fail for several reasons:
• Dust is preventing the fan from spinning smoothly.
• The fan motor has failed.
• The fan bearings are loose and jiggling.
Often, you can tell if there is a fan problem by listening and/or touching the computer. A fan that
has loose bearings starts jiggling and vibrates the case, making a characteristic noise. As time goes
by, the sounds and vibrations will become so prominent that you’ll change the fan out just to regain
some peace and quiet.
You don’t always need to replace the fan. If it is covered with dust, you can often spray away the
dust with compressed air. But even though you might get the fan running again, its life span has
likely been reduced because of the overwork. You should keep an extra fan in reserve in case of
failure.
Processors may also overheat because the heat sink is not properly placed above the processor or
the thermal paste is not of good quality or was applied incorrectly (or not at all) when the system
was built. This is more likely to be a problem with home-built systems but can happen with
commercially manufactured ones as well. The paste can break down over time, and you may need
to reapply it.
Case design is another element that can contribute to or help prevent overheating. Cases with extra
fans, better vents, and adequate room inside for good airflow may cost more but can provide
superior cooling performance. Small cases that squeeze components together can cause overheating.
For this reason, laptops with powerful processors are prone to overheating
2: Bad RAM
Several situations can lead to RAM-related performance problems with a particular machine:
• RAM timing is slower than optimal machine spec.
• RAM has minor flaws that appear only on detailed testing.
• RAM is overheating.
• There is insufficient RAM.
In the old days of Fast Page RAM, buying new RAM for your computer was a simple affair. You
just needed to know what speed your motherboard supported and the maximum each slot would
take. Today, there are many types and speeds of RAM, and the better motherboards may be tolerant
of using RAM that does not match the motherboard’s maximum specs. For example, your
motherboard may support PC133 RAM but will still work with PC100 RAM. But be aware that you
may see performance decreases if you install RAM that is slower than the maximum spec. Some
motherboards will even allow you to mix speeds but will default to the slowest RAM installed.
Minor flaws in RAM chips can lead to system slowdowns and instability. The least expensive chips
often have minor flaws that will cause your system to slow down or Blue Screen intermittently.
Although built-in mechanisms may allow the system to keep working, there is a performance hit
when it has to deal with flawed RAM chips.
In the past, no one worried about RAM chips getting hot, because they didn’t seem to generate
much heat. But that’s changed with newer RAM types, especially SDRAM. To check for
overheating, open your computer’s case, power down, and pull the plug out. Ground yourself and
touch the plastic on one of your RAM chips. Ouch! They get pretty hot. If you find that your RAM
chips are overheating, you should consider buying a separate fan to cool your memory. If your
motherboard doesn’t support a RAM fan, you might be able to get enough additional cooling by
installing a fan card that plugs in to a PCI slot.
Of course, one common reason for poor performance that’s related to RAM is simply not having
enough of it. Modern operating systems such as Windows 7 and today’s resource-hungry
applications, combined with our increasing tendency toward extreme multitasking, result in a need
for more RAM. The minimal specified system requirements may not cut it if you’re doing lots of
multimedia or running other memory-intensive applications. Note that 32-bit Windows is limited to
using 4 GB of RAM, but 64-bit Windows 7 can handle from 8 to 192 GB, depending on the edition.
If your system allows, adding more RAM can often increase performance.
3: Hard disk issues
Traditional hard drives are mechanical devices that eventually wear out. There are many signs of
imminent failure before a hard disk finally gives up. Some of these signs include:
• Slow access times on the affected drive.
• An increasing number of bad sectors when running scandisk and chkdsk.
• Unexplained Blue Screens.
• Intermittent boot failures.
• An “Imminent Hard Disk Failure” warning.
Detecting a failing hard disk can be tricky because the early signs are subtle. Experienced computer
professionals can often hear a change in the normal disk spin. After the disk deteriorates further,
you’ll see the system slow to a crawl. Write processes will take a long time as the system tries to
find good blocks to write to. (This will occur if you’re using a robust file system such as NTFS;
other file systems will likely Blue Screen the computer.)
When you notice the system slowing down, run scandisk or chkdsk, depending on your operating
system. If you notice a bad sector where a good sector existed earlier, that’s a clue that the disk is
going bad. Back up the data on the disk and prepare for it to fail soon. Make sure you have a spare
disk ready so that you can replace it when it fails or replace the disk as soon as you notice the early
signs of failure.
Disk noise and scandisk/chkdsk are your best indicators for identifying a failing drive that’s leading
to a system slowdown. However, if you are managing a system remotely or you can’t take the
system down for a full chkdsk/R
4: Disk type and interface
Once upon a time, buying a hard drive to work with your system was easy. Today, things are more
complicated, with many types of drives available, offering differing levels of performance. Most
modern motherboards will support more than one type.
For best performance, you may want to dump the old IDE PATA type drives and upgrade to SATA,
which comes in several speeds from 1.5 Gb/s to 6 Gb/s. Obviously, the faster drives will also be
more expensive. Some new computers also have eSATA connectors for attaching a SATA drive
externally. Other options for attaching drives externally include USB and Firewire/IEEE 1394.
Slowdowns may be caused by installing programs or often-used files on slow external drives. If you
must use external drives for such files, go with the latest version, such as USB 3.0 (which is up to
four times faster than USB 2.0) or Firewire 800. If you don’t have ports to support the faster
version, you can install a card to add support.
New Solid State Drives (SSDs), which generally connect via SATA, can often provide better
performance than other drive types but cost much more per GB of storage space. Windows 7
includes support for TRIM, which optimizes SSD performance. SCSI drives are still around, too,
notably in the form of Serial Attached SCSI (SAS) with super-fast access times — but they’re
expensive and noisy and used primarily for servers.
5: BIOS settings
One frequently ignored cause of system slowdown is the machine’s BIOS settings. Most people
accept the BIOS settings as they were configured in the factory and leave them as is. However,
slowdowns may occur if the BIOS settings do not match the optimal machine configuration. Often,
you can improve machine performance by researching your motherboard’s optimal BIOS settings,
which may not be the same as the factory defaults.
6: Windows services
Many Windows services are enabled by default. A lot of these services, however, are not required
for your machine to run properly. You should review the services running on your Windows
XP/Vista/7 computer and disable those that you don’t need.
One way to see which services are running is to use the Services applet found in the Administrative
Tools menu. In Windows 7, click Start and type Services in the search box, then select Component
Services. In the console’s left pane, click Services (Local) to display the list of services, shown in

Important information contained in the Services console includes the service Name, Status, and Startup Type. You can get more details on a service by double-clicking on it to bring up the
 service’s Properties, shown in Figure
You can stop the service by clicking the Stop button. If you are sure that you don’t need the service,
click the down arrow in the Startup Type drop-down list box and set the service to Disabled. If you
are not sure if you need the service, change the Startup Type to Manual. Then you’ll have the option
of manually starting the service if you find that you need it.Another way of controlling which services start is using the msconfig utility . In Windows 7, click Start and in the search box, type msconfig. Click msconfig.exe.

7: Runaway processes
Runaway processes take up all of the processors’ cycles. The usual suspects are badly written
device drivers and legacy software installed on a newer operating system. You can identify a
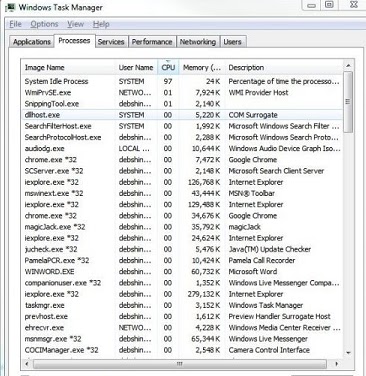
runaway process by looking at the process list in the Windows Task Manager . Any
process that takes almost 100 percent of the processing time is likely a runaway process.
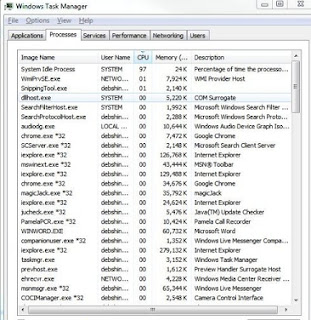
We see an exception to this rule, however, if we click the button to Show Processes from All Users.
On a smoothly running system, the System Idle Process should be consuming the majority of the
processor cycles most of the time. If any other process were to take up 98 percent of the processor
cycles, you might have a runaway process.
If you do find a runaway process, you can right-click it and click the End Process command. You
may need to stop some processes, such as runaway system services, from the Services console. If
you can’t stop the service using the console, you may need to reboot the system. Sometimes a hard
reboot is required.

8: Disk fragmentation
As files are added, deleted, and changed on a disk, the contents of the file can become spread across
sectors located in disparate regions of the disk. This is file fragmentation. All Windows operating
systems subsequent to Windows NT have built-in disk defragmentation tools, but there are also
third-party programs available that give you more options.
If you have traditional hard disks, disk fragmentation can significantly slow down your machine.
The disk heads must move back and forth while seeking all the fragments of a file. A common cause
of disk fragmentation is a disk that is too full. You should keep 20 percent to 25 percent of your
hard disk space free to minimize file fragmentation and to improve the defragmenter’s ability to
defrag the disk. So if a disk is too full, move some files off the drive and restart the defragmenter
9: Background applications
Have you ever visited an end user’s desktop and noticed a dozen icons in the system tray? Each
icon represents a process running in either the foreground or background. Most of them are running
in the background, so the users may not be aware that they are running 20+ applications at the same
time.
This is due to applications starting up automatically in the background. You can find these programs
in the Startup tab of the System Configuration utility. Uncheck the box to
 disable the program from starting at bootup.
10: File system issues and display options
Some file systems work better than others for large disk partitions. Windows 7 should always use
the NTFS file system for best performance.
Cleaning up the file system will also help speed performance. You can use the Disk Cleanup tool to:
• Remove temporary Internet files.
• Remove downloaded program files (such as Microsoft ActiveX controls and Java applets).
• Empty the Recycle Bin.
• Remove Windows temporary files such as error reports.
• Remove optional Windows components you don’t use.
• Remove installed programs you no longer use.
• Remove unused restore points and shadow copies from System Restore.
To run Disk Cleanup in Windows 7, click Start and type Disk Cleanup in the search box. Select the
drive you want to clean up.
Another way to increase performance is by turning off some of the visual effects that make
Windows 7 look cool but use valuable system resources. In Control Panel, click the System applet
and in the left pane, click Advanced System Settings. Under Performance, click the Settings button
and then the Visual Effects tab.

Thank u PLZ Try this to your WINDOWOS 7 so that it will give u good performance
2: Bad RAM
3: Hard disk issues
4: Disk type and interface
5: BIOS settings
6: Windows services
7: Runaway processes
8: Disk fragmentation
9: Background applications
These are basic step to check the reason why pc slow down
1: Processor overheating
Chipmakers have recently been working to make processors more efficient, which means they
generate less heat. Nonetheless, some modern processors still generate a lot of heat. That’s why all
processors require some sort of cooling element, typically a fan of some type. A system’s Thermal
Design Point (TDP) rating indicates, in watts, how much heat it can safely dissipate without
exceeding the maximum temperature for the chip. When the processor temperature goes over spec,
the system can slow down or run erratically (lock up) or may simply reboot. The processor fan may
fail for several reasons:
• Dust is preventing the fan from spinning smoothly.
• The fan motor has failed.
• The fan bearings are loose and jiggling.
Often, you can tell if there is a fan problem by listening and/or touching the computer. A fan that
has loose bearings starts jiggling and vibrates the case, making a characteristic noise. As time goes
by, the sounds and vibrations will become so prominent that you’ll change the fan out just to regain
some peace and quiet.
You don’t always need to replace the fan. If it is covered with dust, you can often spray away the
dust with compressed air. But even though you might get the fan running again, its life span has
likely been reduced because of the overwork. You should keep an extra fan in reserve in case of
failure.
Processors may also overheat because the heat sink is not properly placed above the processor or
the thermal paste is not of good quality or was applied incorrectly (or not at all) when the system
was built. This is more likely to be a problem with home-built systems but can happen with
commercially manufactured ones as well. The paste can break down over time, and you may need
to reapply it.
Case design is another element that can contribute to or help prevent overheating. Cases with extra
fans, better vents, and adequate room inside for good airflow may cost more but can provide
superior cooling performance. Small cases that squeeze components together can cause overheating.
For this reason, laptops with powerful processors are prone to overheating
2: Bad RAM
Several situations can lead to RAM-related performance problems with a particular machine:
• RAM timing is slower than optimal machine spec.
• RAM has minor flaws that appear only on detailed testing.
• RAM is overheating.
• There is insufficient RAM.
In the old days of Fast Page RAM, buying new RAM for your computer was a simple affair. You
just needed to know what speed your motherboard supported and the maximum each slot would
take. Today, there are many types and speeds of RAM, and the better motherboards may be tolerant
of using RAM that does not match the motherboard’s maximum specs. For example, your
motherboard may support PC133 RAM but will still work with PC100 RAM. But be aware that you
may see performance decreases if you install RAM that is slower than the maximum spec. Some
motherboards will even allow you to mix speeds but will default to the slowest RAM installed.
Minor flaws in RAM chips can lead to system slowdowns and instability. The least expensive chips
often have minor flaws that will cause your system to slow down or Blue Screen intermittently.
Although built-in mechanisms may allow the system to keep working, there is a performance hit
when it has to deal with flawed RAM chips.
In the past, no one worried about RAM chips getting hot, because they didn’t seem to generate
much heat. But that’s changed with newer RAM types, especially SDRAM. To check for
overheating, open your computer’s case, power down, and pull the plug out. Ground yourself and
touch the plastic on one of your RAM chips. Ouch! They get pretty hot. If you find that your RAM
chips are overheating, you should consider buying a separate fan to cool your memory. If your
motherboard doesn’t support a RAM fan, you might be able to get enough additional cooling by
installing a fan card that plugs in to a PCI slot.
Of course, one common reason for poor performance that’s related to RAM is simply not having
enough of it. Modern operating systems such as Windows 7 and today’s resource-hungry
applications, combined with our increasing tendency toward extreme multitasking, result in a need
for more RAM. The minimal specified system requirements may not cut it if you’re doing lots of
multimedia or running other memory-intensive applications. Note that 32-bit Windows is limited to
using 4 GB of RAM, but 64-bit Windows 7 can handle from 8 to 192 GB, depending on the edition.
If your system allows, adding more RAM can often increase performance.
3: Hard disk issues
Traditional hard drives are mechanical devices that eventually wear out. There are many signs of
imminent failure before a hard disk finally gives up. Some of these signs include:
• Slow access times on the affected drive.
• An increasing number of bad sectors when running scandisk and chkdsk.
• Unexplained Blue Screens.
• Intermittent boot failures.
• An “Imminent Hard Disk Failure” warning.
Detecting a failing hard disk can be tricky because the early signs are subtle. Experienced computer
professionals can often hear a change in the normal disk spin. After the disk deteriorates further,
you’ll see the system slow to a crawl. Write processes will take a long time as the system tries to
find good blocks to write to. (This will occur if you’re using a robust file system such as NTFS;
other file systems will likely Blue Screen the computer.)
When you notice the system slowing down, run scandisk or chkdsk, depending on your operating
system. If you notice a bad sector where a good sector existed earlier, that’s a clue that the disk is
going bad. Back up the data on the disk and prepare for it to fail soon. Make sure you have a spare
disk ready so that you can replace it when it fails or replace the disk as soon as you notice the early
signs of failure.
Disk noise and scandisk/chkdsk are your best indicators for identifying a failing drive that’s leading
to a system slowdown. However, if you are managing a system remotely or you can’t take the
system down for a full chkdsk/R
4: Disk type and interface
Once upon a time, buying a hard drive to work with your system was easy. Today, things are more
complicated, with many types of drives available, offering differing levels of performance. Most
modern motherboards will support more than one type.
For best performance, you may want to dump the old IDE PATA type drives and upgrade to SATA,
which comes in several speeds from 1.5 Gb/s to 6 Gb/s. Obviously, the faster drives will also be
more expensive. Some new computers also have eSATA connectors for attaching a SATA drive
externally. Other options for attaching drives externally include USB and Firewire/IEEE 1394.
Slowdowns may be caused by installing programs or often-used files on slow external drives. If you
must use external drives for such files, go with the latest version, such as USB 3.0 (which is up to
four times faster than USB 2.0) or Firewire 800. If you don’t have ports to support the faster
version, you can install a card to add support.
New Solid State Drives (SSDs), which generally connect via SATA, can often provide better
performance than other drive types but cost much more per GB of storage space. Windows 7
includes support for TRIM, which optimizes SSD performance. SCSI drives are still around, too,
notably in the form of Serial Attached SCSI (SAS) with super-fast access times — but they’re
expensive and noisy and used primarily for servers.
5: BIOS settings
One frequently ignored cause of system slowdown is the machine’s BIOS settings. Most people
accept the BIOS settings as they were configured in the factory and leave them as is. However,
slowdowns may occur if the BIOS settings do not match the optimal machine configuration. Often,
you can improve machine performance by researching your motherboard’s optimal BIOS settings,
which may not be the same as the factory defaults.
6: Windows services
Many Windows services are enabled by default. A lot of these services, however, are not required
for your machine to run properly. You should review the services running on your Windows
XP/Vista/7 computer and disable those that you don’t need.
One way to see which services are running is to use the Services applet found in the Administrative
Tools menu. In Windows 7, click Start and type Services in the search box, then select Component
Services. In the console’s left pane, click Services (Local) to display the list of services, shown in
Figure


You can stop the service by clicking the Stop button. If you are sure that you don’t need the service,
click the down arrow in the Startup Type drop-down list box and set the service to Disabled. If you
are not sure if you need the service, change the Startup Type to Manual. Then you’ll have the option
of manually starting the service if you find that you need it.Another way of controlling which services start is using the msconfig utility . In Windows 7, click Start and in the search box, type msconfig. Click msconfig.exe.

7: Runaway processes
Runaway processes take up all of the processors’ cycles. The usual suspects are badly written
device drivers and legacy software installed on a newer operating system. You can identify a
runaway process by looking at the process list in the Windows Task Manager . Any
process that takes almost 100 percent of the processing time is likely a runaway process.
We see an exception to this rule, however, if we click the button to Show Processes from All Users.
On a smoothly running system, the System Idle Process should be consuming the majority of the
processor cycles most of the time. If any other process were to take up 98 percent of the processor
cycles, you might have a runaway process.
If you do find a runaway process, you can right-click it and click the End Process command. You
may need to stop some processes, such as runaway system services, from the Services console. If
you can’t stop the service using the console, you may need to reboot the system. Sometimes a hard
reboot is required.

8: Disk fragmentation
As files are added, deleted, and changed on a disk, the contents of the file can become spread across
sectors located in disparate regions of the disk. This is file fragmentation. All Windows operating
systems subsequent to Windows NT have built-in disk defragmentation tools, but there are also
third-party programs available that give you more options.
If you have traditional hard disks, disk fragmentation can significantly slow down your machine.
The disk heads must move back and forth while seeking all the fragments of a file. A common cause
of disk fragmentation is a disk that is too full. You should keep 20 percent to 25 percent of your
hard disk space free to minimize file fragmentation and to improve the defragmenter’s ability to
defrag the disk. So if a disk is too full, move some files off the drive and restart the defragmenter
9: Background applications
Have you ever visited an end user’s desktop and noticed a dozen icons in the system tray? Each
icon represents a process running in either the foreground or background. Most of them are running
in the background, so the users may not be aware that they are running 20+ applications at the same
time.
This is due to applications starting up automatically in the background. You can find these programs
in the Startup tab of the System Configuration utility. Uncheck the box to

10: File system issues and display options
Some file systems work better than others for large disk partitions. Windows 7 should always use
the NTFS file system for best performance.
Cleaning up the file system will also help speed performance. You can use the Disk Cleanup tool to:
• Remove temporary Internet files.
• Remove downloaded program files (such as Microsoft ActiveX controls and Java applets).
• Empty the Recycle Bin.
• Remove Windows temporary files such as error reports.
• Remove optional Windows components you don’t use.
• Remove installed programs you no longer use.
• Remove unused restore points and shadow copies from System Restore.
To run Disk Cleanup in Windows 7, click Start and type Disk Cleanup in the search box. Select the
drive you want to clean up.
Another way to increase performance is by turning off some of the visual effects that make
Windows 7 look cool but use valuable system resources. In Control Panel, click the System applet
and in the left pane, click Advanced System Settings. Under Performance, click the Settings button
and then the Visual Effects tab.

Thank u PLZ Try this to your WINDOWOS 7 so that it will give u good performance
Subscribe to:
Posts (Atom)