Windows XP Home Network Setup: Essential Steps
Lots of homes nowadays have more than one computer, with all of them sharing one Internet connection (the household carries a single subscription to the Internet service provider of their locality).Computers are becoming cheap and powerful, to say nothing of their usefulnesss for both school and work.With lots of computers in the home, it is essential to build a home network. This article can be used not only for creating a home network, but its concepts and techniques can also be applied to a small office network.
Computer networking offers a lot of advantages in terms of cost and productivity, such as:
- Family members can share files and programs instead of needing to transfer them physically from one location to another with a USB stick or other physical methods.
- The monetary savings of having one vs. multiple ISP subscriptions. If the ISP allows home networking (some will NOT so you'd better check with the ISP before subscribing), you can share your single Internet subscription with other computers in your home by using a router. In this case, you only have to pay a single monthly bill for your Internet connection.
The Requirements and the Basics
The Requirements and the Basics
To network computers using Windows XP, you will need the following
- At least two computers in your network
- A LAN card for each computer
- One router for connecting the computers and the Internet
- One Internet subscription line
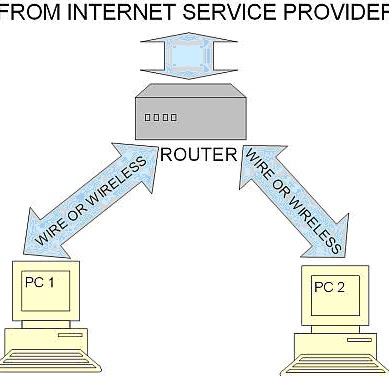
Once you have this set of hardware components as well as an Internet connection, it is time to connect your router to the computer
Windows XP Home Network Setup: Essential Steps - Configuring the Router
You only need one computer attached to the router to configure it, but it MUST be attached. You cannot configure your router for networking without a computer attached to it. Say you connect PC1 (personal computer 1) first to the router. Depending on the router type, the input/output system of the router consists of two types of ports. These are Ethernet port inputs and the WAN port inputs.
The Ethernet inputs are used to connect the router to other computers under the network. The WAN port is used to receive the Internet connection coming from other routers or gateways. However, it can be confusing to beginners, so below is an image of a router back (using a WRT54GC Wireless router):
 Using a LAN cable (you can buy this at computer store), connect one end to Port 1 (see screen shot above) and the other to the LAN port of your network card. Using the built-in network card from the PC's motherboard will work fine, so in this case there is no need to purchase another network card.
IMPORTANT: Do NOT connect other computers to this router or connect Internet input from your ISP to this router yet. Only connect one computer to this router at this time (for configuration purposes).
Once connected, turn on the router. You can connect the router power cord at one end to the power port shown above, and plug it in. The next thing you will do is test whether the router's connection is okay.
Using a LAN cable (you can buy this at computer store), connect one end to Port 1 (see screen shot above) and the other to the LAN port of your network card. Using the built-in network card from the PC's motherboard will work fine, so in this case there is no need to purchase another network card.
IMPORTANT: Do NOT connect other computers to this router or connect Internet input from your ISP to this router yet. Only connect one computer to this router at this time (for configuration purposes).
Once connected, turn on the router. You can connect the router power cord at one end to the power port shown above, and plug it in. The next thing you will do is test whether the router's connection is okay.
Here is an example of a message you would receive if your router's connection is okay
Pinging 192.168.1.1 with 32 bytes of data:
Reply from 192.168.1.1: bytes=32 time<1ms TTL=128
Reply from 192.168.1.1: bytes=32 time<1ms TTL=128
Reply from 192.168.1.1: bytes=32 time<1ms TTL=128
Reply from 192.168.1.1: bytes=32 time<1ms TTL=128
Ping statistics for 192.168.1.1:
Packets: Sent = 4, Received = 4, Lost = 0 (0% loss),
Approximate round trip times in milli-seconds:
Minimum = 0ms, Maximum = 0ms, Average = 0ms
Most routers are shipped with 192.168.1.1 as the default local IP address; however, if this doesn't work and you are sure that the cable connection to the router is correct, please check with the router manual. It may point you to other configuration options or local IP addresses.
Windows XP Home Network Setup: Essential Steps - Configuring the Internet Connection
You can use your Internet browser (such as Internet Explorer, Safari, Chrome or Fire fox) to see the router dashboard/control panel. You need to take this step to configure your Internet connection. First, open your browser. Then type in the address bar below:
http://192.168.1.1
Then press enter.
Most routers will ask for your username and password. The default is using admin as the username and password. You can check with your router's manual to see the default username and password. Once you have successfully logged in, you will be taken to your router's basic setup page.
The router configuration largely depends on the way your ISP delivers the Internet connection to your computer. However, the most common “Internet Connection type” is “Automatic Configuration-DHCP.” So the typical settings are the following
Router name: Fill this in with your router name (e.g WRT54G)
Host name: {leave this blank}
Domain name: {leave this blank}
MTU: Auto
Size: 1500
Local IP address: 192.168.1.1 (note: however this router IP address can change if you have two or more routers in your network.).
DHCP Server: Enabled
Starting IP address: 192.168.1.100 (note: this may change if the router address is not based on 192.168.1.1, like if you have two or more routers)Maximum Number of DHCP users: 50
Client lease time: 0
Static DNS 1 to Static DNS 3: (Set to all zero e.g. 0.0.0.0)
WINS: 0
Time zone: select your appropriate time zone.
After all of these settings have been made to your satisfaction, click, “save settings.”
Windows XP Home Network Setup: Essential Steps - Configuring Your Computer to Connect
Go to Control Panel (in your Windows XP computer), and then click on Network connections. Look for “Local Area Connection.” Right click on it, and click “Properties.” Find “Internet Protocol (TCP/IP)” and click Properties. The following should be checked:
Share your connection
If there is no problem with anything you've done up to this point, you are now ready to connect other computers to the network. To do this, simply connect a LAN cable from the network card to the router's Ethernet inputs (see screen shot in the previous page). After connecting, do the same ping test in the DOS mode, targeting 192.168.1.1 (the router's IP address). If there is a reply, the connection has been made. Do the same with a wireless connection -- however, you will not be using Ethernet cable of course; instead, follow the procedure in your wireless network card manual.
Finally, to make file sharing work with other computers, make sure:
- Obtain an IP address automatically.
- Obtain DNS server address automatically.
- Client for Microsoft networks.
- File and printer sharing for Microsoft networks.
- QoS Packet scheduler d. Internet Protocol (TCP/IP) (the most important).
Share your connection
If there is no problem with anything you've done up to this point, you are now ready to connect other computers to the network. To do this, simply connect a LAN cable from the network card to the router's Ethernet inputs (see screen shot in the previous page). After connecting, do the same ping test in the DOS mode, targeting 192.168.1.1 (the router's IP address). If there is a reply, the connection has been made. Do the same with a wireless connection -- however, you will not be using Ethernet cable of course; instead, follow the procedure in your wireless network card manual.
Finally, to make file sharing work with other computers, make sure:
· File and printer sharing is enabled under Local Area Connection properties, using the procedure explained earlier.
· Go to Control Panel -> Network Connections -> Network Setup wizard. Follow the wizard procedure. When presented with the appropriate option, choose “This computer connects to the Internet through another computer on my network or through a residential gateway” and finally, select “Just finish the wizard; I don't need to run wizard on other computers.”
Restart the computers in your network, and you can start sharing files.
Great blog, keep up the good work. Glad to see sites like this. Home Network Setup
ReplyDeleteI really appreciate the kind of topics you post here. Thanks for sharing us a great information that is actually helpful.
ReplyDeletesupreme varsity jacket
I think the web owner would understand. Detroit Lions Varsity Jacket
ReplyDelete